To run a payroll in Patriot Software, you’ll use the Payroll Entry screen on Step 1 to enter hours and money for your employees. The Payroll Entry screen appears when you click “Run a New Payroll” under Payroll > Payroll Tasks > Run a New Payroll.
Here is information that may appear on the Payroll Entry screen, and how to change it to see only what you need.
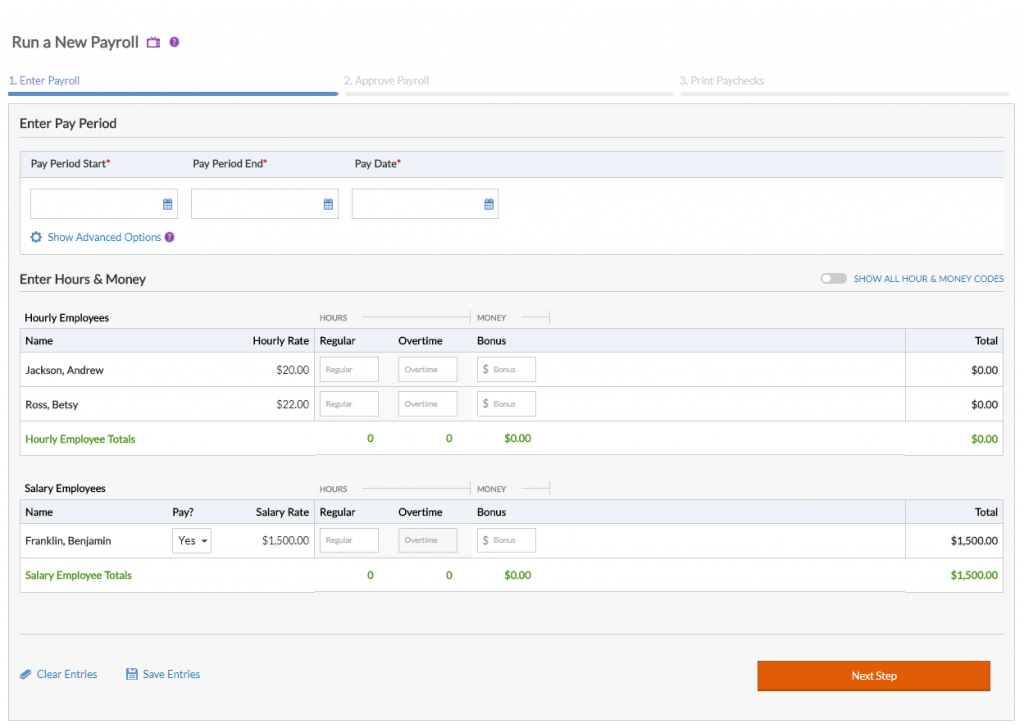
Pre-filled Payroll Dates
The Pay Period Start Date, Pay Period End Date, and Pay Date will be pre-filled after you run your first payroll, based on your most recent payroll and pay frequency. If you do not want to have these three dates pre-filled, click the “Show Advanced Options” link and change “Pre-fill Payroll Dates” to “No.”
Employee List
The Payroll Entry screen lists all active employees, grouped by Hourly and Salary. If you have Salary Non-Exempt employees, they will appear in their own group. If an employee does not appear in this list, they may be inactive. To activate an employee, see How Do I Reactivate an Employee?
Hourly and Salary Employees
For hourly employees, you must enter hours worked, since gross pay depends on the hours paid.
For salary employees, you don’t need to enter hours worked in most cases, but you may do so for tracking purposes. A few states require entering hours for salaried workers. The number of hours worked won’t affect gross pay. The “Pay?” field is automatically set to “Yes” and their flat dollar salary rate is included in the payroll. To turn off a salaried employee’s regular pay, select “No.”
Missing Information
If an employee is missing required information for payroll processing, a warning message appears beside their name. You must fill in any missing info on the employee’s screen before paying that person. You can still run payroll for the rest of your employees.
Hours and Money Codes
You can set frequently used hour and money codes in Settings > Payroll Settings > Hours & Money Codes. Each employee’s row will show the frequently used codes. To use more codes, click the “Show All Hour & Money Codes” switch. All active hours and money codes will appear. To change the status of a code, go to Payroll > Payroll Settings > Hours & Money Types > Select the code > Edit. Check or uncheck the Active box, and click Save.
Deductions and Contributions
By default, all active deductions and contributions that haven’t met limits will be included in the payroll. You can exclude any or all deductions and contributions in a payroll. For example, you’re running payroll for a second bonus check, and you’ve already collected the proper amount of deductions/contributions. Click the Options link, check any deductions and/or contributions that you do not want to include in the payroll.
Direct Deposits
To give all employees live paychecks for a payroll run, you can turn off direct deposits for all employees. Click the Options link, and check the box beside Turn Off Direct Deposits to print or manually create live checks for everyone in the payroll.
Clearing All Payroll Entries
To clear all payroll entries and start over, click the blue “Clear All” button at the top right of the screen. This will remove anything you have entered, including your pay period and pay date.
Saving Your Payroll Entries
You may save your entries in the Payroll Entry sheet and return to your work later. After you make entries, click Save Entries. You can continue to make entries in the Payroll Entry sheet after you Save.
If you have an unfinished payroll, the “Run a New Payroll” link in the Payroll menu will change to “Finish Payroll.” You can have one unfinished payroll at a time. When you click “Finish Payroll,” you will be taken to the payroll step where you stopped.